I've cooked pan seared chicken breast probably a thousand times. And for the first hundred, I kept wondering why mine looked pale and tasted like cardboard while restaurant versions had that golden crust and stayed juicy. The fix wasn't a fancy pan or a secret marinade. It was one thing I was doing wrong every single time.
What's in this guide
Here's the short version: you're probably cooking cold chicken in a cold pan. That's it. That's the mistake. Everything else—the butter, the herbs, the basting—is secondary. Let me walk you through exactly how I do it now, including the small details that took me years to notice.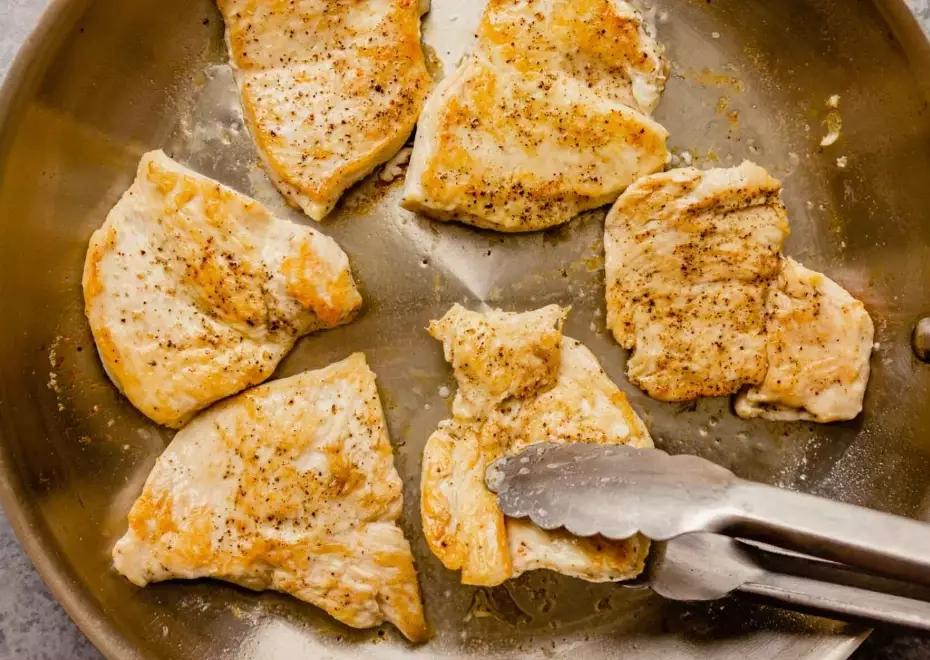
Why Your Pan Seared Chicken Breast Dries Out
Chicken breast has almost no fat. Unlike thighs, which can handle a little abuse, breast meat goes from perfectly juicy to sawdust in about 90 seconds. The protein fibers contract when heated, squeezing out moisture. If you heat it slowly, those fibers tighten gradually and release more liquid before the outside ever browns.
So the goal is simple: get the outside browned fast, keep the inside just cooked through, and stop the cooking before the fibers squeeze dry.
The non-negotiable rule: Your pan must be hot enough that a drop of water sizzles and evaporates on contact. If it just sits there, you're steaming, not searing.
I learned this from a chef at a small bistro in Lyon who watched me put a cold breast into a lukewarm pan and physically winced. He said, "You're not searing. You're boiling it in its own sadness." Fair.
How to Pan Sear Chicken Breast (Step-by-Step)
This is the method I use now. It takes about 15 minutes total, most of which is waiting.
What You Need
A heavy skillet (cast iron or stainless steel—nonstick won't give you a good crust), a meat mallet or rolling pin, paper towels, salt, and a high-smoke-point oil like avocado or canola. Butter comes later, not at the start.
The Steps
1. Dry the chicken like you mean it. Pat both sides with paper towels until the surface feels tacky, not wet. Moisture is the enemy of browning. I use two paper towels per breast and press firmly.
2. Pound to even thickness. Place the breast between two sheets of plastic wrap and pound the thick end until the whole piece is about 3/4 inch thick. This is the step most recipes gloss over, but it's why some bites are dry and others are perfect. Uneven thickness means uneven cooking.
3. Salt generously—and do it early. I salt both sides about 30 minutes before cooking. This gives the salt time to penetrate. If you're in a rush, salt right before, but the texture won't be quite as good.
4. Heat the pan until it's genuinely hot. Medium-high heat for 2-3 minutes. Add a thin film of oil. You should see a shimmer, not smoke.
5. Lay the breast in away from you. It should sizzle immediately. If it doesn't, take it out and wait. Don't move it for 4-5 minutes. This is where the crust forms.
6. Flip once. Add a knob of butter and a smashed garlic clove if you want. Tilt the pan and spoon the foaming butter over the top for another 3-4 minutes.
7. Check the temperature. Pull it off at 160°F. It will rise to 165°F while resting. If you wait until 165°F in the pan, you've overcooked it.
The Thickness Problem Nobody Talks About
I used to buy the biggest chicken breasts I could find. More meat, right? Wrong. Those giant breasts are often 1.5 inches thick at one end and 1/2 inch at the other. By the time the thick part is cooked, the thin part is jerky.
Now I either pound them even or buy smaller breasts (around 6-8 ounces each). The difference in texture is not subtle. It's the difference between a piece of meat you chew and a piece of meat you cut with a fork.
| Breast Size | Thickness | Cooking Time (per side) | Internal Temp (pull off heat) |
|---|---|---|---|
| Small (5-6 oz) | 1/2 inch | 3 minutes | 160°F |
| Medium (7-8 oz) | 3/4 inch | 4-5 minutes | 160°F |
| Large (10+ oz) | 1 inch+ (pounded) | 5-6 minutes | 160°F |
Resting: The Step Most People Skip
You know how a steak keeps cooking after you take it off the heat? Chicken does the same thing. If you cut into it right away, the juices run out onto the cutting board. Five minutes of rest on a warm plate (not a cold one) lets the juices redistribute.
I rest mine for 5 minutes, loosely tented with foil. Not wrapped tight—that steams the crust you just worked for.
One small thing I noticed: chicken rested on a cold plate cools down too fast and the outside gets sweaty. I warm my plates in a low oven while the chicken cooks. It's a tiny habit that makes a real difference.
Questions I Get Asked All the Time
My chicken breast always sticks to the pan. What am I doing wrong?
The pan isn't hot enough, or you're using a pan that isn't well-seasoned. Cast iron and stainless steel need to be heated dry for a full 2-3 minutes before the oil goes in. If you add oil to a cold pan, it never gets hot enough. Also, don't flip too early. The meat releases itself when the crust has formed. If it resists, give it another minute.
Can I pan sear chicken breast without pounding it first?
You can, but you'll get uneven cooking. The thick end will be borderline raw while the thin end is dry. If you don't have a mallet, slice the breast horizontally into two thinner cutlets. That works just as well and cooks faster.
How do I get a crust without burning the outside?
Watch the heat. If the oil starts smoking heavily before you add the chicken, the pan is too hot. Pull it off the heat for 30 seconds, add the chicken, then return it to the burner. Also, sugar-based marinades burn quickly. Pat the chicken dry and use oil-based seasonings instead.
Is it okay to use olive oil for pan searing chicken breast?
Extra-virgin olive oil has a lower smoke point and can turn bitter at high heat. I use regular olive oil (not extra-virgin) or avocado oil if I'm searing at medium-high. Save the good stuff for finishing.
I've tested this method on gas, electric, and induction stoves. The timing shifts slightly—electric takes a bit longer to recover heat when the chicken goes in—but the principles hold. Start with a hot pan, dry meat, even thickness, and pull it early. That's the whole game.
This article was fact-checked against the USDA's Safe Minimum Cooking Temperatures guide for poultry.
Leave a Comment